How to use this guide in a sales conversation
Each section below shows one real screen inside a tenant workspace, captured live from
wise-and-agile-solutions.scalegate.io with the Playwright browser automation tool.
For every page you get four blocks written for someone selling the product,
not just a developer operating it:
- 👀 What the customer sees — exactly what appears on screen, in plain language
- 💰 Why they'll pay for it — the business problem this page solves, with the pitch you can repeat in a demo
- 🎯 Demo walkthrough — the click path to show it off in a 5-minute call
- ⚠️ Things to know — gotchas, prerequisites, and honest limits so you don't oversell
Click any screenshot to open it full-size in a new tab. The table of contents on the left stays pinned as you scroll. Every screen was captured on the same viewport (1440×900) with a real logged-in MasterAdmin session, so the data you see — applications, plans, licences, payments, audit entries — is all real.
https://{tenant}.scalegate.io/
🌐 Public

👀 What the customer sees
This is the public root page at your tenant subdomain — the URL you hand out to end customers (the "Share with customers" pill in the admin top bar is exactly this link). It loads with the tenant's branded hero ("One Platform to License, Protect & Monetize Your Software"), feature panels, a live SDK code sample, call-to-action buttons ("Start Free Trial", "Forest Admin", "Get Started"), and a footer with contact info. No login required.
💰 Why they'll pay for it
Every tenant gets their own fully-hosted marketplace at {their-slug}.scalegate.io (or their own custom domain). Customers land here, browse apps, sign up, and buy licences — all under the tenant's brand, not ScaleGate's. This is the difference between "a licensing SDK" and "a complete SaaS business-in-a-box": the tenant never has to build a customer-facing site, handle SEO metadata, or host a landing page.
🎯 Demo walkthrough
- Open the admin portal and point at the "Share with customers" pill in the top bar — "this is the URL you send to buyers".
- Click the external-link icon next to it — it opens the tenant's own public marketplace in a new tab.
- Scroll down the hero, SDK section, and pricing — "this is generated from your catalogue and your branding. No marketing site to build."
⚠️ Things to know
Out of the box the hero copy is the ScaleGate default. The tenant can override every colour, logo, font and the welcome text from the White Label page (screen 15). Customers never see the word "ScaleGate" unless the tenant opts to keep a small "Powered by" footer credit.
/admin/login
🌐 Public
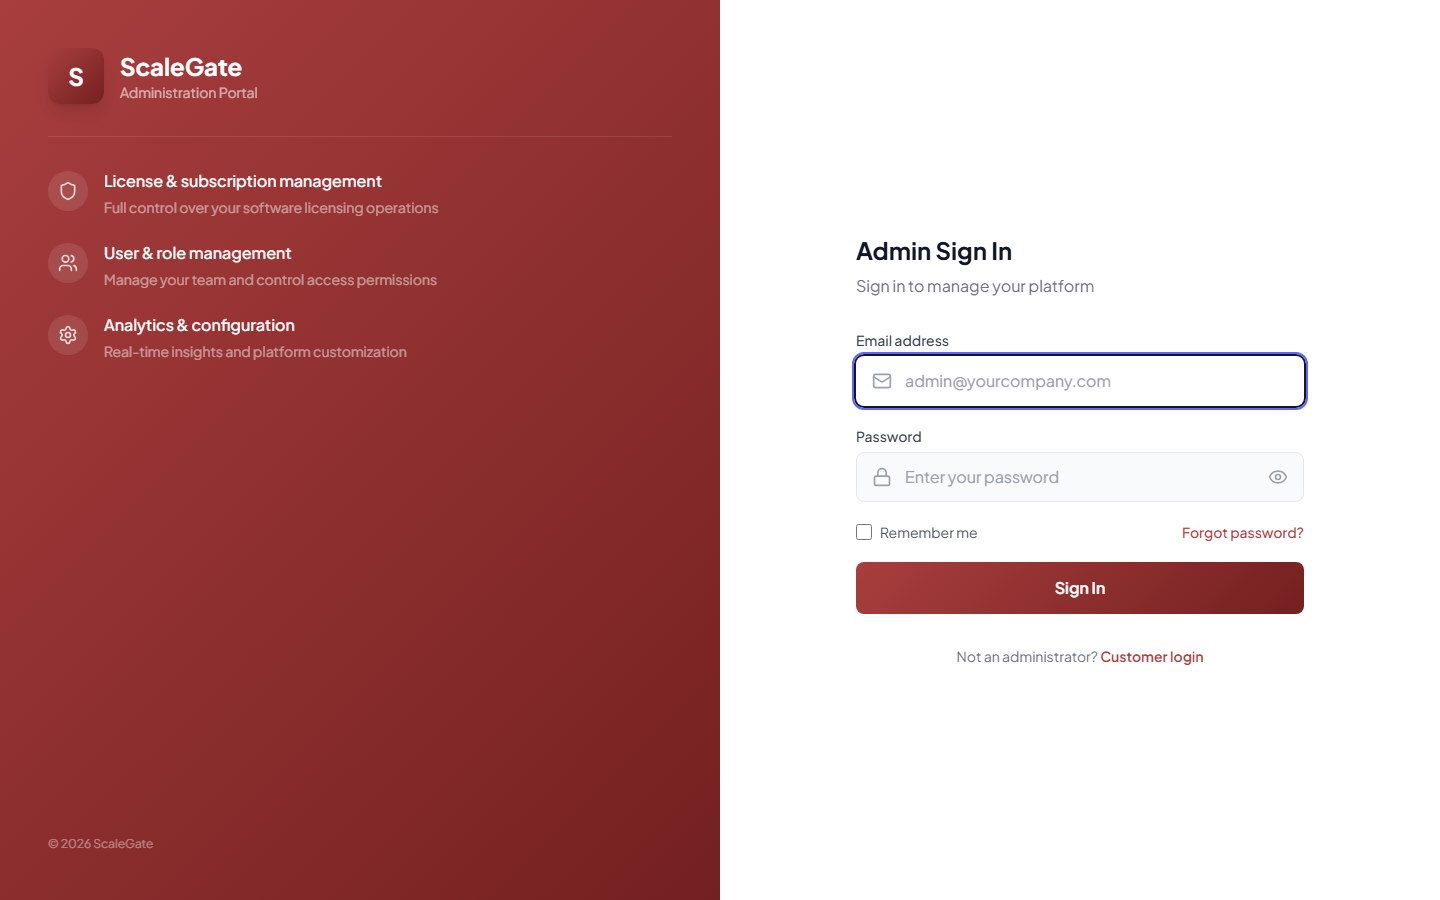
👀 What the customer sees
A two-panel page. The left panel is branded with the tenant's primary colour (red in this capture), with the tenant wordmark at the top, the label "Administration Portal", and three value bullet points (licence & subscription management, user & role management, analytics & configuration). The right panel has the admin sign-in card: Email address, Password, Remember me checkbox, Forgot password link, Sign In button, and a "Not an administrator? Customer login" link for non-admins who landed here by mistake.
💰 Why they'll pay for it
The admin and customer logins are separate pages with separate credentials and separate JWT signing — a tenant admin can't accidentally be escalated from a customer account. Combined with per-tenant password reset, MFA, and the audit log (screen 14), this is the kind of auth separation enterprise buyers expect out of the box and don't want to implement themselves.
🎯 Demo walkthrough
- Show the prospect the login page on their own subdomain.
- Point at the brand colour and the tenant name on the left panel: "this red is the tenant's brand — nothing about ScaleGate is on this page".
- Click Forgot password → explain the reset email is sent from the tenant's own configured
Email Fromaddress, and lands back on this same branded page.
⚠️ Things to know
Admin accounts are created via the Invitations flow (screen 11). A tenant cannot register a new admin through this form — only through an emailed invitation. That's intentional for security; make sure prospects understand admin on-boarding is invite-only.
/login
🌐 Public
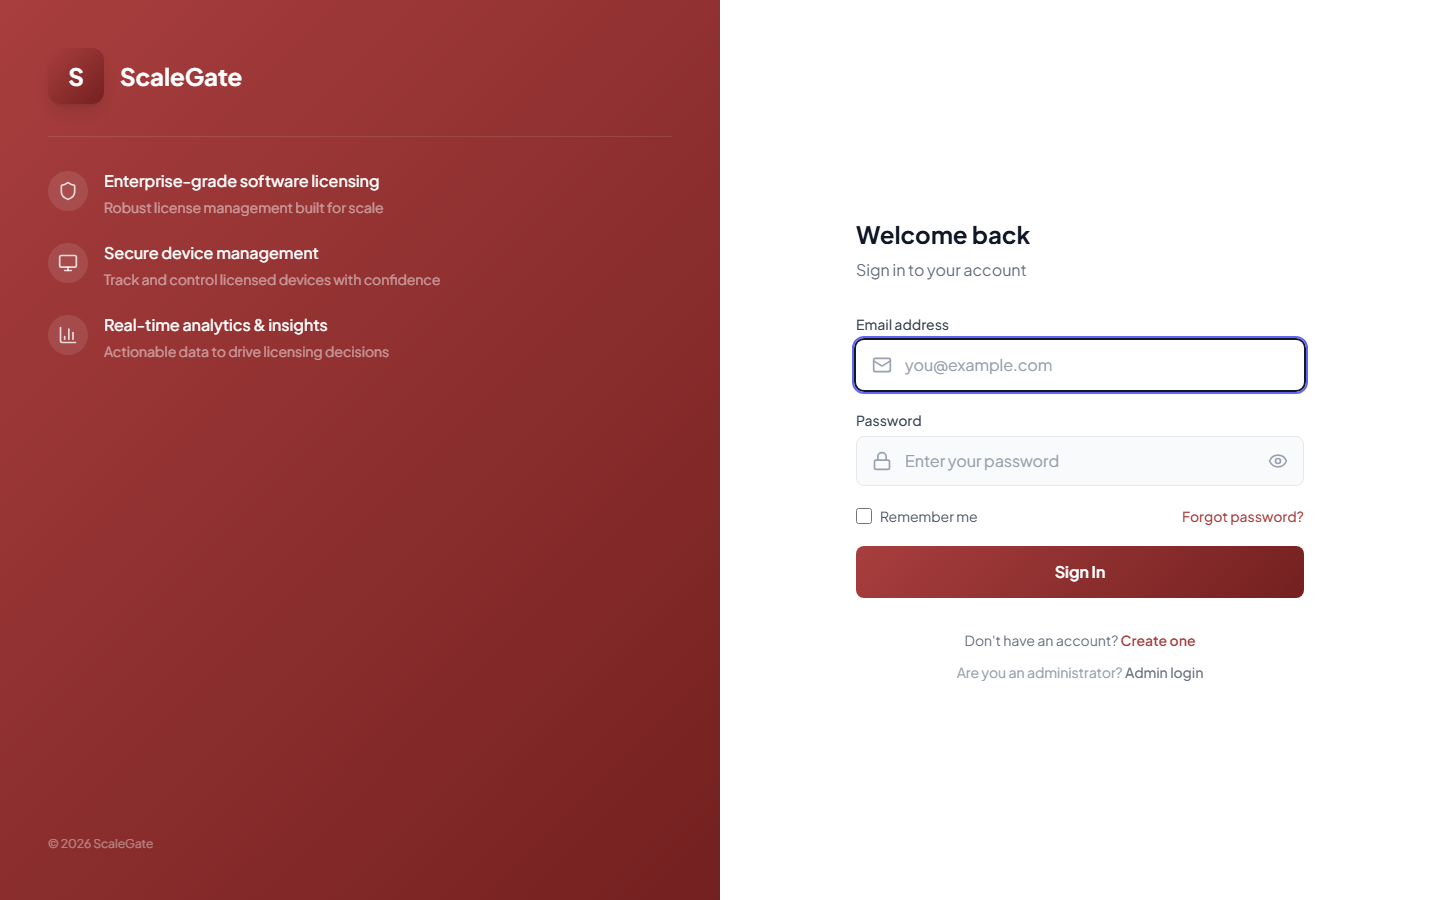
👀 What the customer sees
Same two-panel layout as the admin login, but the right card is titled "Welcome back" with the tagline "Sign in to your account". Fields: Email, Password, Remember me, Forgot password, Sign In. Below the form: "Don't have an account? Create one" and "Are you an administrator? Admin login".
💰 Why they'll pay for it
This is the front door for the tenant's end customers — the people who actually pay money to buy software licences. The branded login sits entirely on the tenant's own domain, so the customer never sees "ScaleGate" during purchase. From a conversion standpoint that's huge: trust and recognition stay with the tenant's brand.
🎯 Demo walkthrough
- Open the
/loginroute on the tenant subdomain in a separate tab. - Show the prospect that it shares the same branding (logo, colours) as the admin login but is a completely different audience.
- Click Create one → goes to the customer-signup form (next screen).
⚠️ Things to know
Customers who land on the admin login page can hop to the customer login via the "Customer login" link, and vice-versa. The tenant should share the root URL with customers, not /admin/login — customers get routed to the right place automatically.
/register
🌐 Public
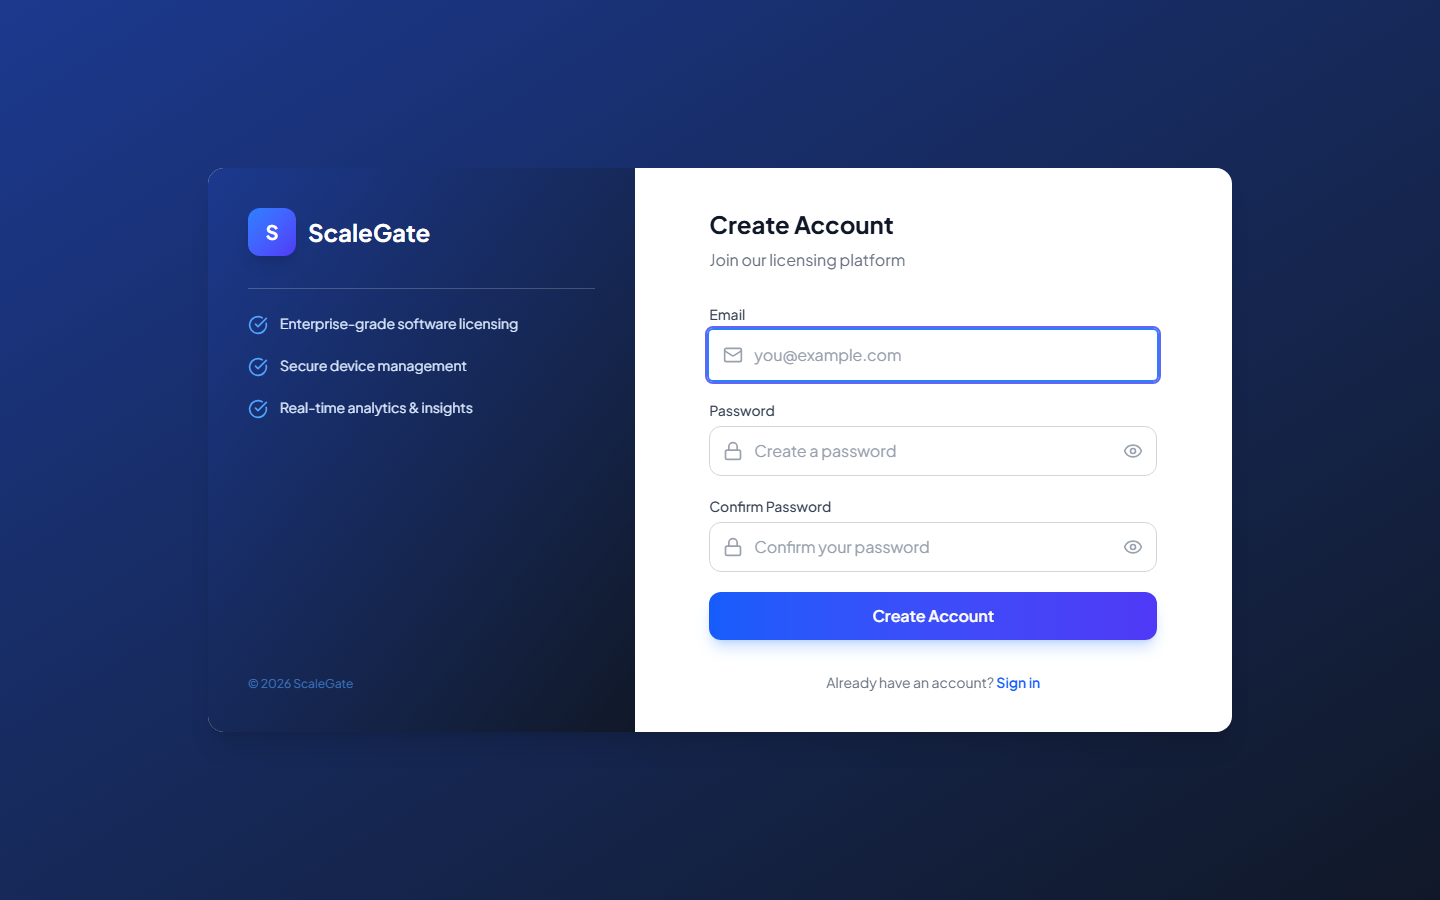
👀 What the customer sees
A centred card on a dark gradient background titled "Create Account", subtitle "Join our licensing platform". Fields: Email, Password (with show/hide eye), Confirm Password (with show/hide eye), and a big gradient Create Account button. Below it: "Already have an account? Sign in".
💰 Why they'll pay for it
Self-serve signup is the growth engine. The tenant drops the signup URL into marketing emails, WhatsApp broadcasts, a website CTA — customers register themselves, complete their profile on first login, and can buy a licence without anyone at the tenant lifting a finger. Every signup automatically lands in the User Management page (screen 10) and the Audit Log (screen 14).
🎯 Demo walkthrough
- Show the prospect an incognito window hitting
/register. - Fill in a throwaway email — "the customer gets a verification email sent from your own Brevo/SMTP account, branded in your colours".
- Explain that on first login the customer is routed to
/complete-profileto collect industry, company size, country, etc. — useful data for the dashboard analytics.
⚠️ Things to know
Email verification is required before the customer can make a purchase. If the tenant's SMTP sender isn't properly authenticated (SPF/DKIM) the verification email may be dropped silently by Gmail — always test end-to-end with a real customer email.
/dashboard
🔐 Admin Only
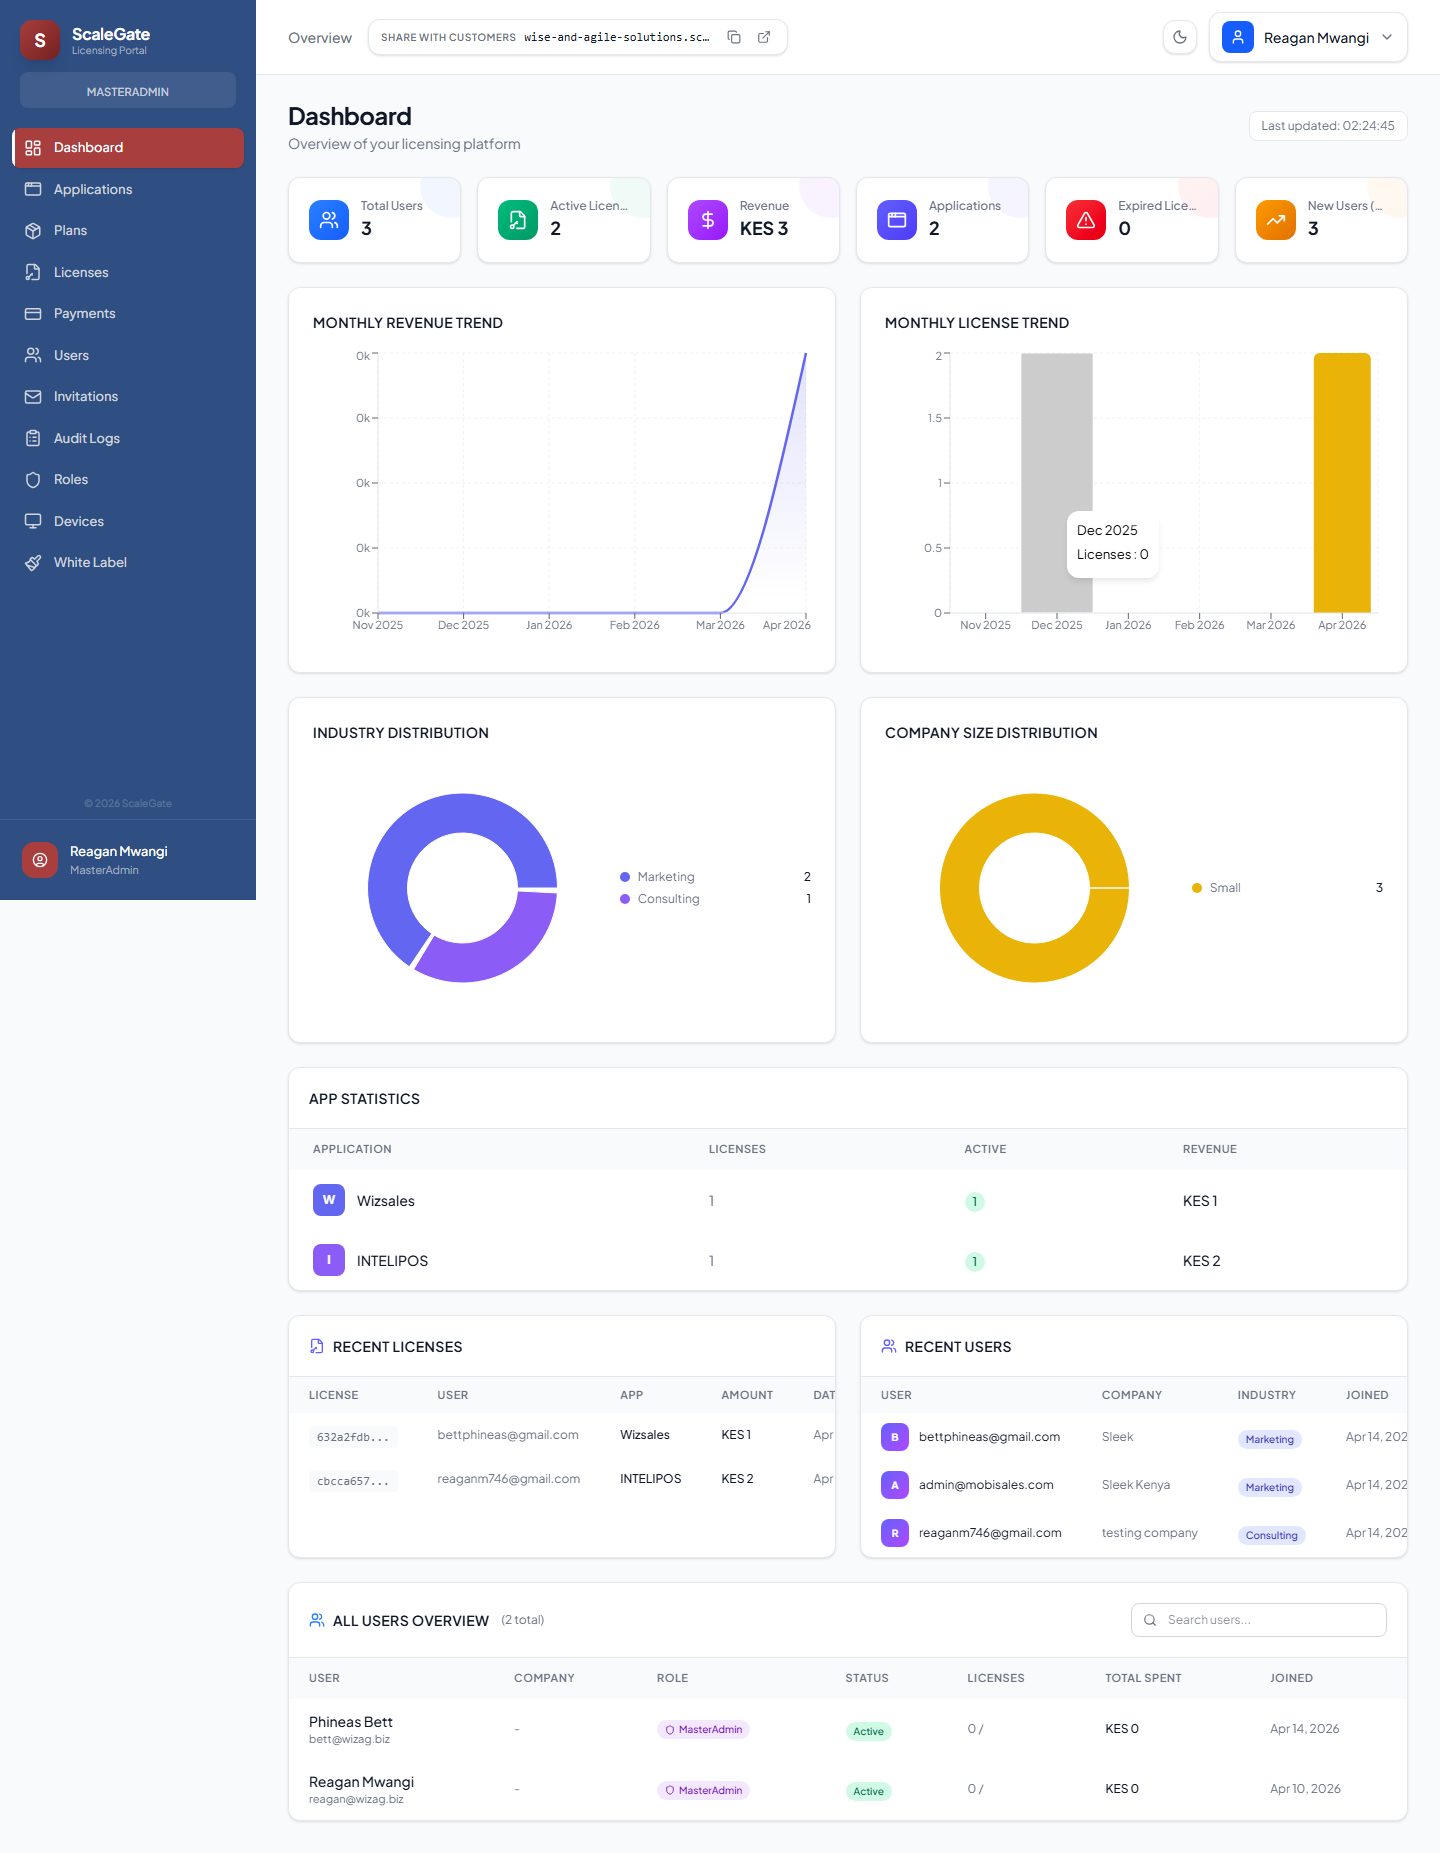
👀 What the customer sees
The landing page after login. A row of six KPI tiles across the top — Total Users, Active Users, Revenue KES 3, Applications, Expired Licenses, Master Admins. Below that, two time-series charts — Monthly Revenue Trend (line) and Monthly License Trend (bar) — showing month-over-month activity. Under the charts, two donut charts — Industry Distribution and Company Size Distribution — breaking down customers by sector and headcount. Then an App Statistics table listing each published application with its licence count, active licences, and revenue. Finally, two side-by-side cards — Recent Licenses and Recent Users — and an All Users Overview table at the bottom.
💰 Why they'll pay for it
This is the single page a tenant's owner will leave open all day. In 30 seconds it answers: "Am I making money? How many active customers today? Which app is growing? Are customers renewing?" Most ISVs don't have any of this — they ship a product, count licences manually in a spreadsheet, and cross their fingers. ScaleGate gives them a board-ready report on day one.
🎯 Demo walkthrough
- Log in and land here — pause on the KPI row: "this is the first thing you see every morning".
- Point at the Revenue Trend chart: "last 6 months of revenue, tracked without you doing any bookkeeping".
- Scroll to App Statistics: "which of your apps is driving licence sales — helpful when deciding which one to invest more in".
- Scroll down to Recent Licenses — "every sale hits this list in real time".
⚠️ Things to know
The Industry and Company Size donuts rely on customers completing their profile at signup. If the tenant imports customers from an existing system without profile data, the donuts will show "unknown" slices — the fix is to trigger a Complete Profile prompt on first login, which the platform does automatically.
/applications
🔐 Admin Only
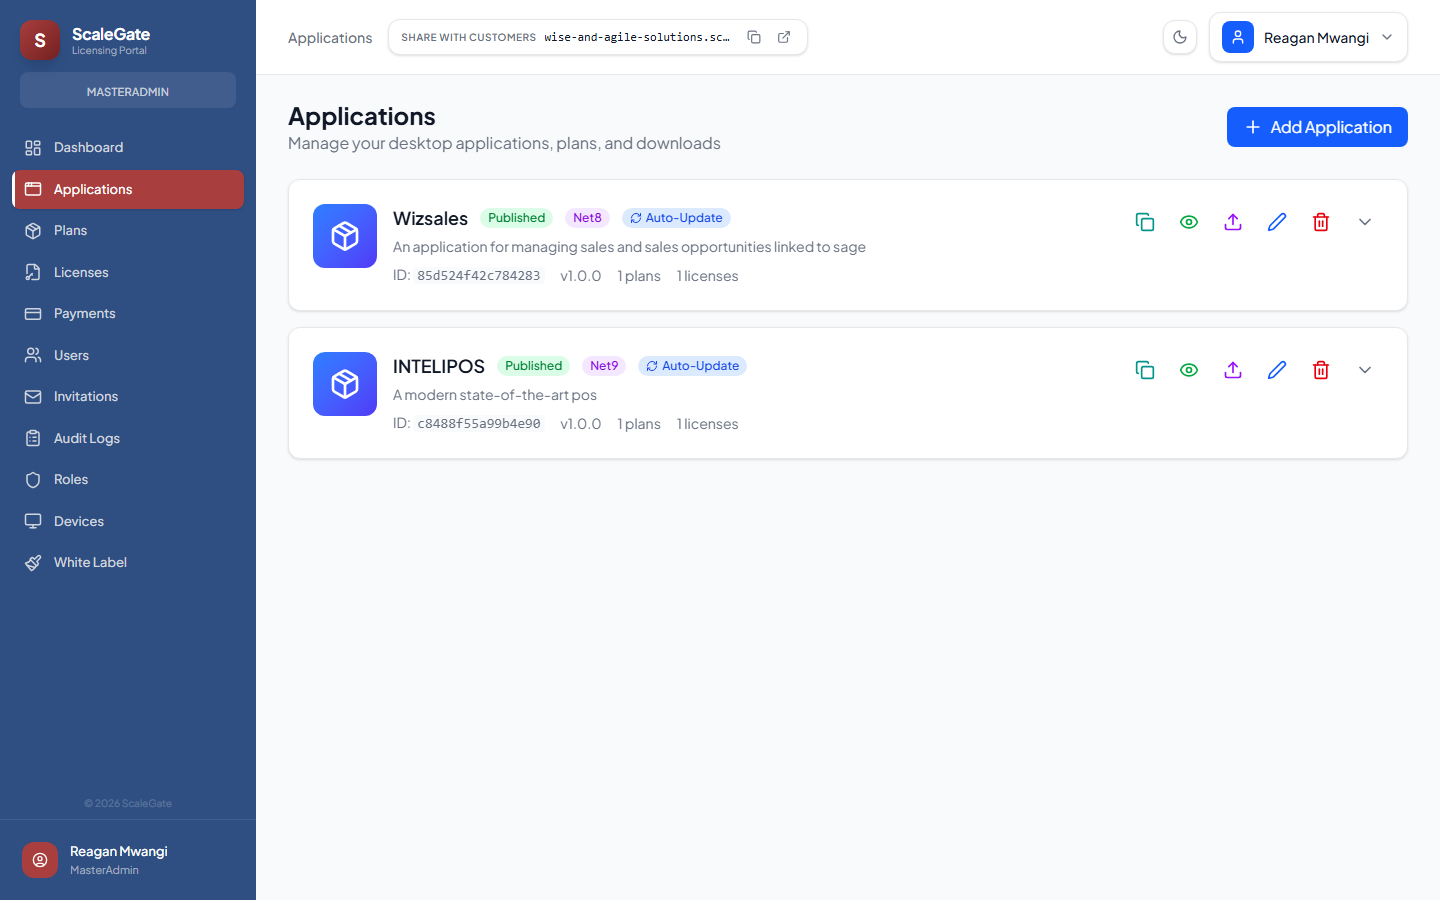
👀 What the customer sees
A catalogue of every application the tenant sells licences for. Each application is a card showing the app icon, name, Published / Draft badge, runtime badge (Net9, Net8, Net48), Auto-Update badge, short description, and an ID row with the AppId, current version, plan count, and licence count. On the right: quick-action icons for Copy SDK config, Publish/Unpublish, Upload binary, Edit, Delete, and Expand (to see plans, versions, and uploaded files inline). A big + Add Application button in the top-right creates new entries.
💰 Why they'll pay for it
This is where an ISV turns "a folder of ZIP files on my hard drive" into "a product catalogue with pricing, analytics, and a download funnel". Clicking Copy SDK config generates the exact appsettings.json block the developer pastes into their WPF/.NET installer — that's the link between the admin portal and the actual software being licensed.
🎯 Demo walkthrough
- Click + Add Application: the full-height side panel slides in. Walk through the Basics / Marketing / Technical / Release / Visibility sections.
- Drop a real ZIP into the Application file dropzone — upload progress is visible in the footer.
- Toggle Publish to marketplace — explain this is what makes it visible on the tenant's customer marketplace.
- Click the teal Copy SDK config icon on an existing card — show the toast "SDK config copied" and paste into a text editor to show the JSON block.
⚠️ Things to know
Uploaded binaries go directly to Azure Blob Storage via browser-to-blob PUT (bypassing the API server, so 500 MB uploads are fine). Each upload creates an AppVersions row which is what the /api/downloads/request endpoint serves — so uploading a binary is what makes it downloadable from My Apps.
/plans
🔐 Admin Only
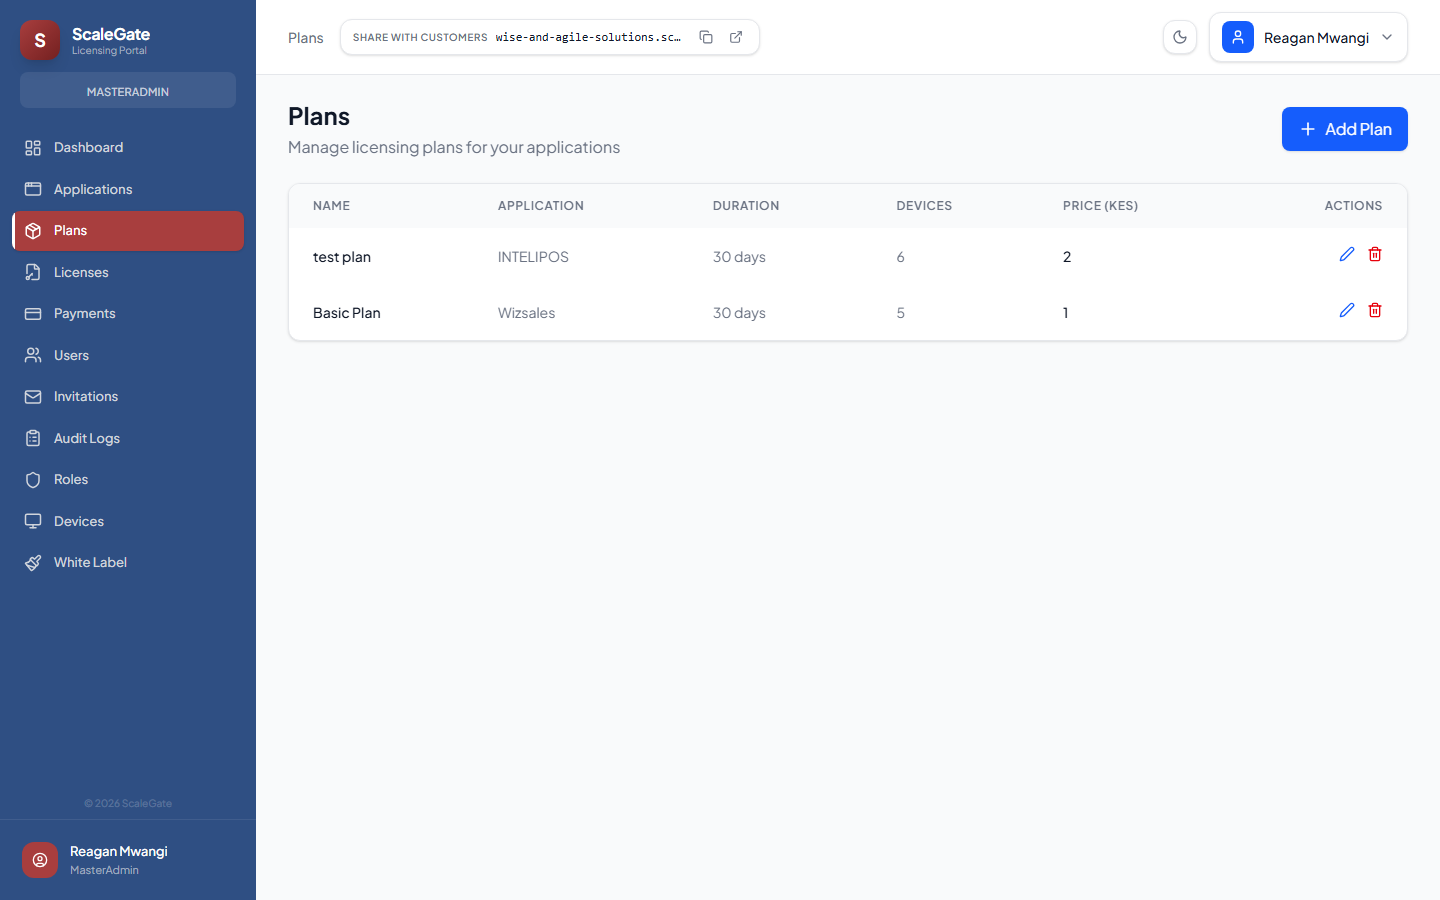
👀 What the customer sees
A clean table listing every pricing plan across every application. Columns: Name, Application, Duration, Devices, Price (KES), Actions (edit/delete). A + Add Plan button opens a side panel to create a new one. In the capture you can see two real plans — test plan (INTELIPOS, 30 days, 6 devices, KES 2) and Basic Plan (Wizsales, 30 days, 5 devices, KES 1). Note the "Share with customers" pill now visible in the top bar — this is the new widget that lets admins copy their marketplace URL in one click.
💰 Why they'll pay for it
Every software sale is actually a plan sale — you're not selling the app, you're selling "30 days of Wizsales on up to 5 devices". Plans decouple pricing from products: the tenant can run a $1 entry plan, a $10 "Pro" plan, and a $50 "Enterprise" plan against the same binary, just by creating three rows here. No code changes, no redeploys.
🎯 Demo walkthrough
- Click + Add Plan: the side panel asks for Plan Name, Application (dropdown of published apps), Duration Days, Max Devices, Price. Fill it in in 20 seconds.
- Save — it appears in the table immediately.
- Show the prospect how easy it is to run an experiment: "duplicate this, set price to 50% off for 30 days, see what converts".
⚠️ Things to know
Deleting a plan that already has active licences attached is blocked — the UI shows a confirmation and the API returns a 400. That's intentional so you don't orphan customers. To retire a plan cleanly, create a new one, migrate future buyers to it, and only delete the old one once its licences have all expired.
/licenses
🔐 Admin Only

👀 What the customer sees
A table of every licence key ever issued by the tenant. Columns: License Key (truncated, click to copy), Application, Plan, Devices (used/max), Status (Active / Inactive / Expired), Expires (date), and a row action. The Total n licenses counter sits in the top-right.
💰 Why they'll pay for it
Without this page, customers lose their licence keys and email support begging for them. With this page, the tenant admin can find any licence by key or user in one click, manually extend a duration for a goodwill gesture, suspend a chargeback, or reset the device count when a customer upgrades their laptop. Every support ticket that used to take 15 minutes now takes 15 seconds.
🎯 Demo walkthrough
- Click a licence key to copy it to the clipboard.
- Click the details action — show licence detail panel with full expiry date, devices linked, payment history.
- Explain the workflow: customer emails "my laptop died, I can't activate" → admin opens this page → resets the device → customer reactivates in seconds.
⚠️ Things to know
Licence keys are generated as 32-character hex GUIDs (Guid.NewGuid().ToString("N")). They're written to the tenant's own database — not shared, not poolable between tenants. A licence created in this tenant's workspace is meaningless outside it.
/payments
🔐 Admin Only
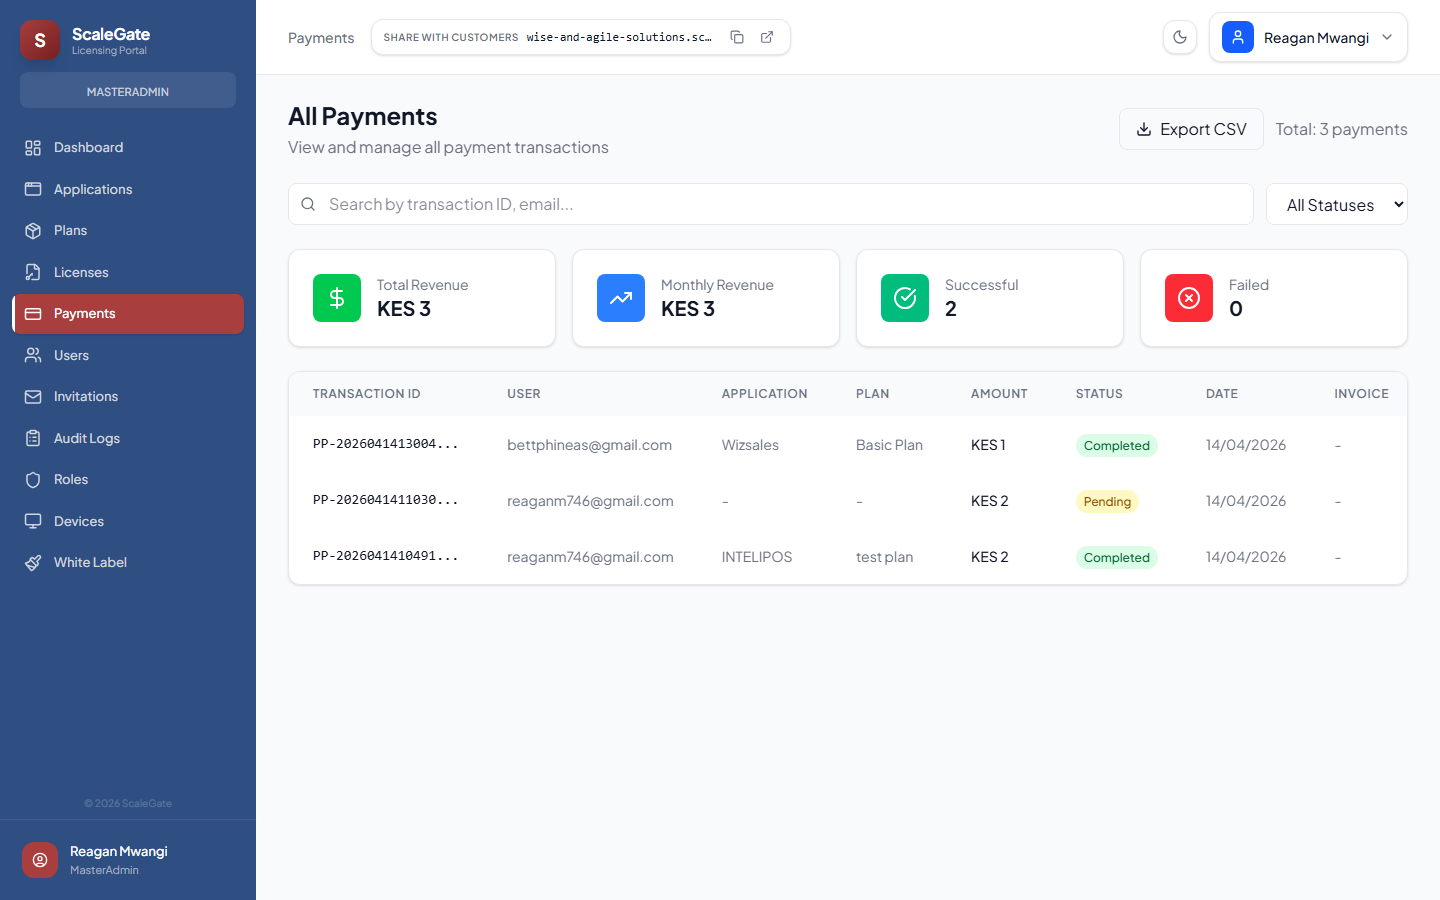
👀 What the customer sees
An All Payments ledger with a search box, status filter (All Statuses / Completed / Pending / Failed / Refunded), and an Export CSV button top-right. Four KPI tiles: Total Revenue KES 3, Monthly Revenue KES 3, Successful 2, Failed 0. Below that, a transaction table with: Transaction ID (PP-...), User email, Application, Plan, Amount, Status badge, Date, Invoice #. In this capture you see two Completed PesaPal payments (KES 1 Basic Plan and KES 2 test plan) and one Pending.
💰 Why they'll pay for it
This is the accountant's page and the boss's favourite page. Every mobile-money payment, every card charge, every refund, every chargeback flows through here with a full audit trail. Export CSV drops it straight into QuickBooks or the tenant's accounting software. No manual reconciliation against PesaPal dashboards.
🎯 Demo walkthrough
- Point at the KPI tiles: "this is your MRR today, no spreadsheet required".
- Click Export CSV — show the file format, explain it maps cleanly onto standard accounting templates.
- Filter by Status: Pending — explain what happens when PesaPal takes a minute to confirm: the row flips to Completed automatically once the IPN arrives or the customer reloads the callback page.
⚠️ Things to know
The tenant's revenue share with ScaleGate (the platform fee) is never shown to customers and never appears in the PDF receipt attached to confirmation emails. Customers only see the total they paid. The tenant-admin view shows gross revenue — that's this screen.
/users
🔐 Admin Only
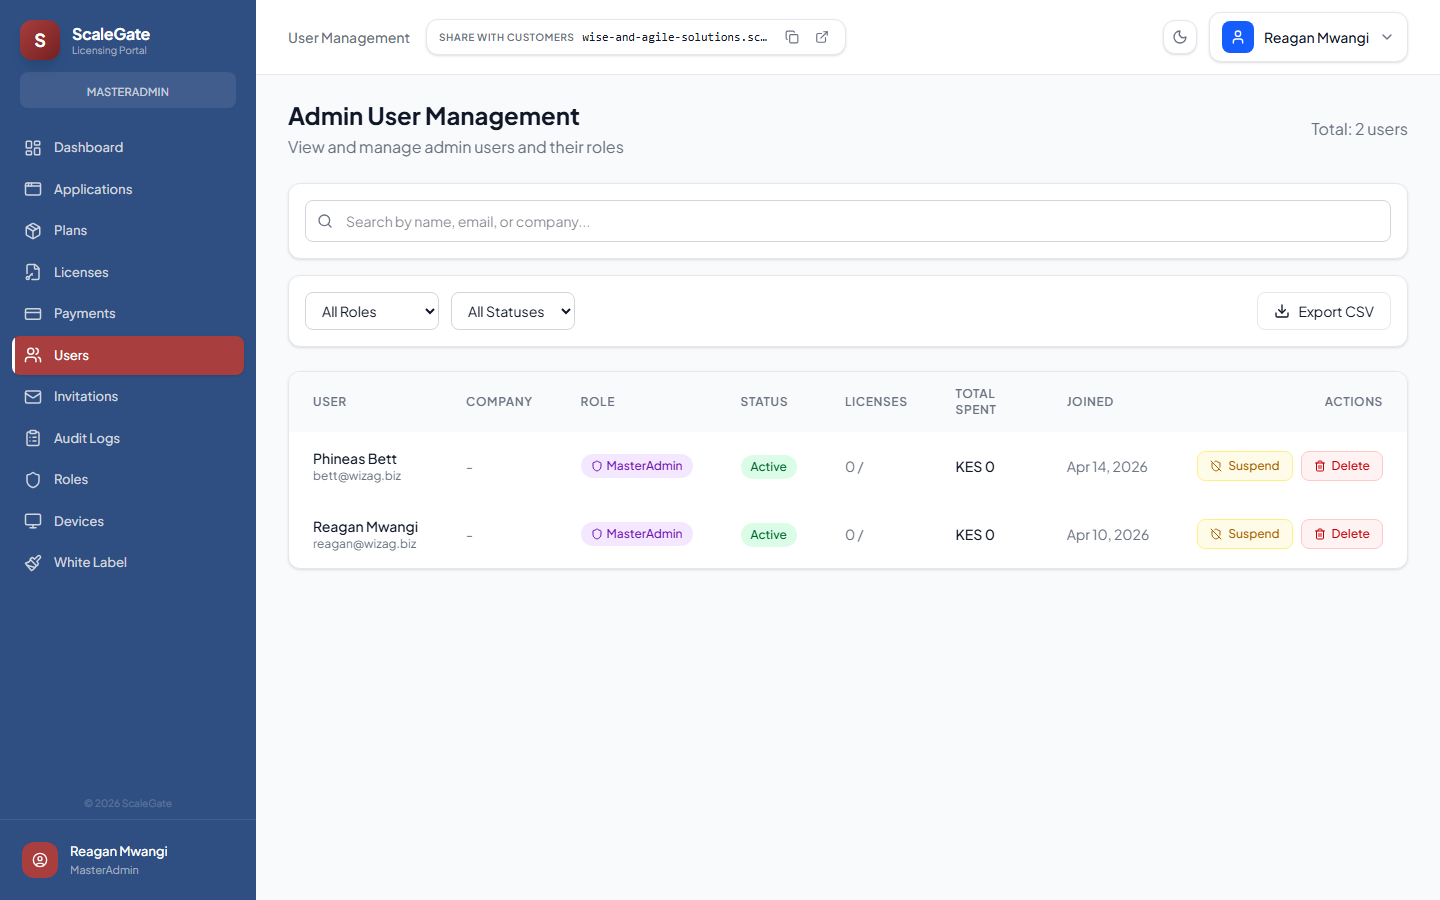
👀 What the customer sees
Header reads Admin User Management, "View and manage admin users and their roles". A total count in the top-right, a search box, two filter dropdowns (All Roles, All Statuses), and an Export CSV button. The table columns: User (avatar + name + email), Company, Role (badge), Status (Active/Suspended/Locked), Licenses, Total Spent, Joined, Actions (Suspend / Delete).
💰 Why they'll pay for it
Every person who interacts with the tenant's system — other admins, paying customers, free-tier users — is indexed on this page. The tenant can instantly see "who has admin access, who bought what, who's been suspended". Suspend a problematic account in one click and every active session terminates immediately (session revocation via the refresh-token blacklist).
🎯 Demo walkthrough
- Filter by Role: MasterAdmin — show how small the admin group usually is (2 in this capture).
- Click a user row — opens a side panel with their recent activity, devices, and payment history.
- Click Suspend on a test account → explain the account is instantly locked out and added to the audit log.
⚠️ Things to know
Suspending a user does NOT revoke their issued licences — that's a separate action on the Licenses page. It only prevents them from logging into the portal. If you want to block an offline activation too, revoke the licence.
/invitations
🔐 Admin Only
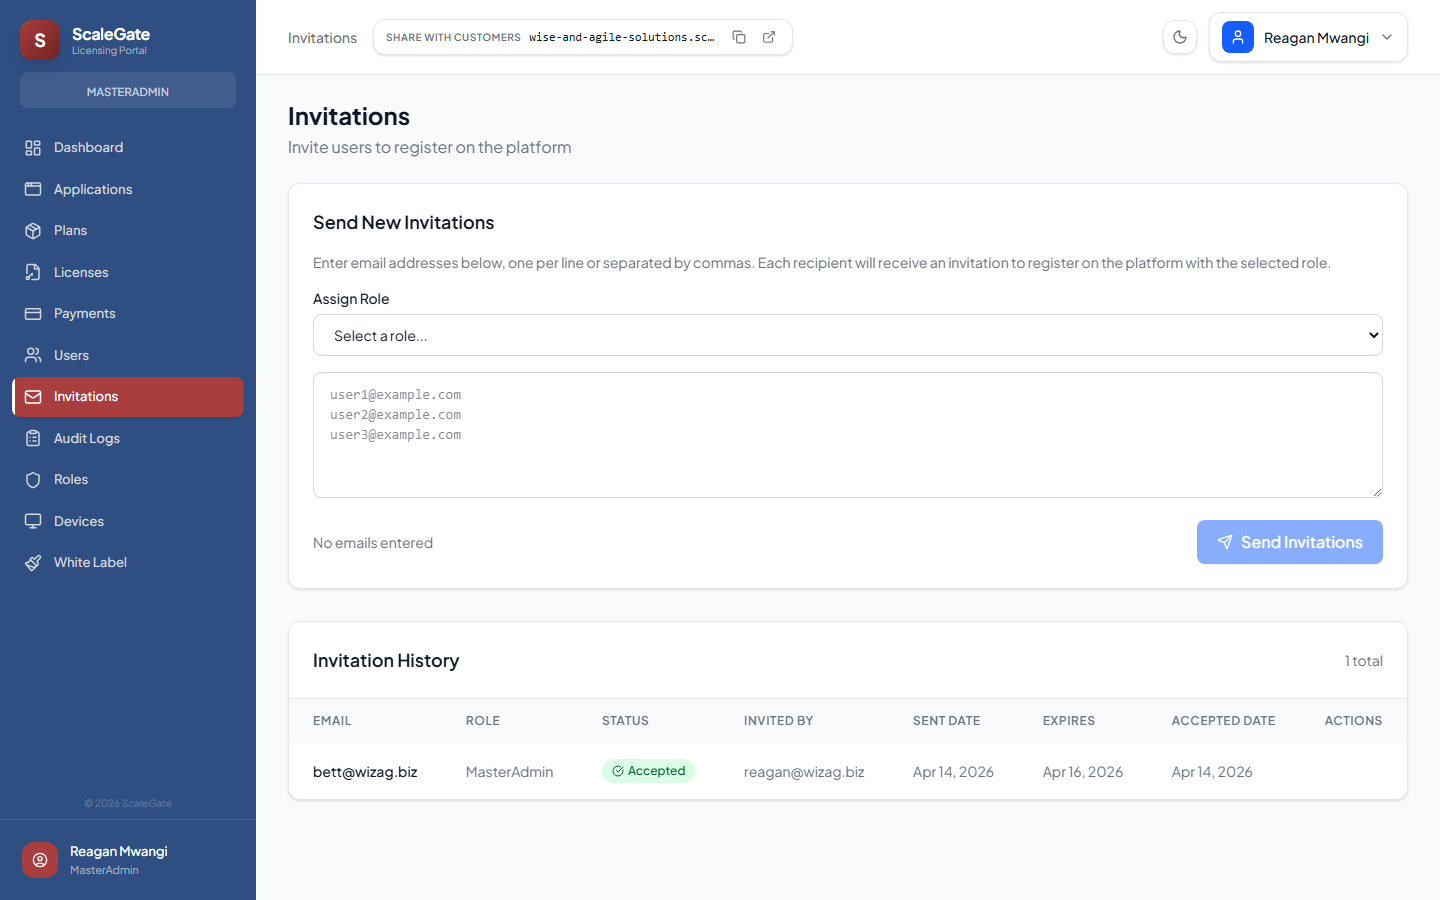
👀 What the customer sees
Two stacked cards. The top card is Send New Invitations with an Assign Role dropdown, a large multi-email textarea ("Enter email addresses below, one per line or separated by commas"), and a Send Invitations button. The bottom card is Invitation History: a table with Email, Role, Status (Pending / Accepted / Expired), Invited By, Sent Date, Expires, Accepted Date, and a row action.
💰 Why they'll pay for it
Adding a new admin is not a form-fill exercise — it's an email invitation flow that goes through the tenant's own branded email template, expires after 48 hours, and is signed with a single-use token. The new admin clicks the link, sets their own password, and lands in the dashboard. Way more secure than the alternative (creating accounts by hand and sending temporary passwords in a chat).
🎯 Demo walkthrough
- Paste three comma-separated emails into the textarea.
- Pick a role — MasterAdmin for full access, or a custom role created on the Roles page for scoped access.
- Click Send Invitations — all three receive the same branded email in parallel.
- Scroll down to Invitation History to show audit trail.
⚠️ Things to know
Invitations expire 48 hours after sending. If an invited admin doesn't click the link in time, the row flips to Expired — the admin can send a new one from the same table without re-typing the email.
/roles
🔐 Admin Only

👀 What the customer sees
Header Roles Management, subtitle "Create and manage roles with specific permissions for admin users", and a + Create Role button. The body is a grid of role cards. In this capture the tenant only has the built-in MasterAdmin role — marked BUILT-IN — with a note "Full system access. Cannot be modified or deleted". New roles appear as additional cards listing the permission tags they grant (e.g. licenses.view, plans.manage).
💰 Why they'll pay for it
Real businesses don't give every employee god-mode. They need roles like "Support" (can view and extend licences, can't delete apps), "Accountant" (read-only, can export CSV), "Product Manager" (can create plans, can't touch payments). This page lets them build any role they want in a point-and-click way — no code, no YAML, no seat-per-role licensing tax.
🎯 Demo walkthrough
- Click + Create Role — wide side panel opens with role name, description, and a permissions grid organised into categories (Applications, Licenses, Plans, Payments, Users, Audit, etc.).
- Build a "Support Agent" role: tick licenses.view, licenses.manage, users.view — leave the rest unchecked.
- Save — then demonstrate inviting a new admin with that role on the Invitations page.
⚠️ Things to know
The MasterAdmin role is built in and always has every permission — you can't downgrade it, delete it, or remove yourself from it if you're the last MasterAdmin. Custom roles are fully editable but can't exceed MasterAdmin's permission set.
/devices
🔐 Admin Only
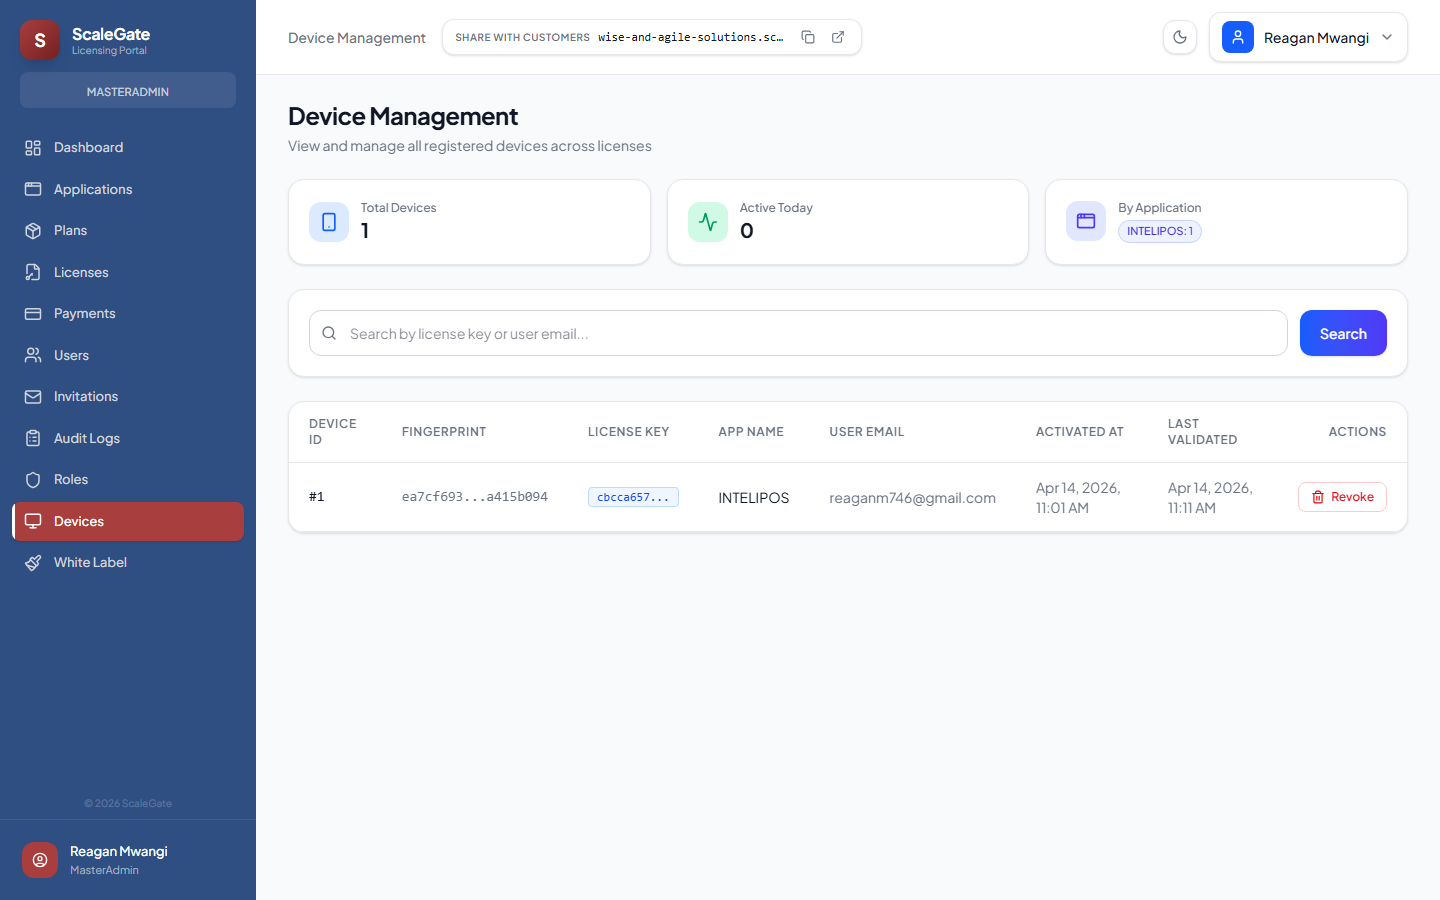
👀 What the customer sees
Header Device Management, subtitle "View and manage all registered devices across tenants". Three KPI tiles at the top — Total Devices, Active Today, By Application. Search box. Table columns: #, Fingerprint, License Key (truncated), App Name, User Email, Activated At, Last Seen, Actions (Revoke).
💰 Why they'll pay for it
Device limits are one of the biggest headaches in desktop software licensing. Someone buys "up to 6 devices" and every month calls support because they reinstalled Windows and burned a slot. This page gives the admin a real-time view of which physical machines are using which licence keys right now — and one-click Revoke to free a slot. Plus "Last Seen" tells you which devices are actually in use vs dead.
🎯 Demo walkthrough
- Search by customer email — find all devices a particular customer has activated.
- Click a fingerprint to see device details (OS, hostname, activation IP, last heartbeat).
- Click Revoke → confirm dialog → slot is instantly freed. The SDK running on that machine will get a revoked response on its next heartbeat and show the customer a friendly "reactivation required" screen.
⚠️ Things to know
Device fingerprints are generated by the Licensing.SDK on the client — they hash CPU ID, motherboard serial, and machine SID together. Changing hardware (new SSD only) typically keeps the fingerprint. A full hardware refresh (new laptop) generates a new fingerprint and counts as a new device slot — which is when revocation becomes useful.
/audit-logs
🔐 Admin Only

👀 What the customer sees
A full-bleed Audit Logs table, sub-titled "Track all system activity and user actions". Auto-refresh toggle, manual Refresh, and Filters button top-right. Columns: Time (relative "13h ago" + absolute timestamp), User Email, Action (colour-coded badges: Login, DownloadRequested, LicenseCreated, PaymentCompleted, EmailVerified, AppUpdated, VersionCreated, ProfileCompleted, Register, AccountLocked, AccountSuspended), Description, IP Address. Pagination at the bottom shows "Showing 20 of N log entries".
💰 Why they'll pay for it
Every serious buyer — especially in finance, healthcare, and government — will ask "can you show me an audit trail?" during procurement. This page is the answer: every login, every licence created, every payment, every admin action, every failed attempt, every suspension. Immutable, timestamped, IP-logged, exportable. You don't need to build SOC 2 evidence — the audit log already is the evidence.
🎯 Demo walkthrough
- Scroll the live log — point at the rainbow of action badges: "every type of activity has its own colour so you can scan for trouble visually".
- Filter by Action: PaymentCompleted — "here's every sale, in order, with the exact second it happened".
- Filter by Action: AccountLocked — "here are the security events nobody wants to miss".
- Toggle Auto-refresh — new rows appear live as other admins take actions.
⚠️ Things to know
Audit log rows are append-only. An admin cannot edit or delete an entry — even a MasterAdmin. Retention is unlimited by default; the platform operator can set a retention policy on the Forest Admin side if a tenant asks for GDPR-compliant purging.
/branding
🔐 Admin Only
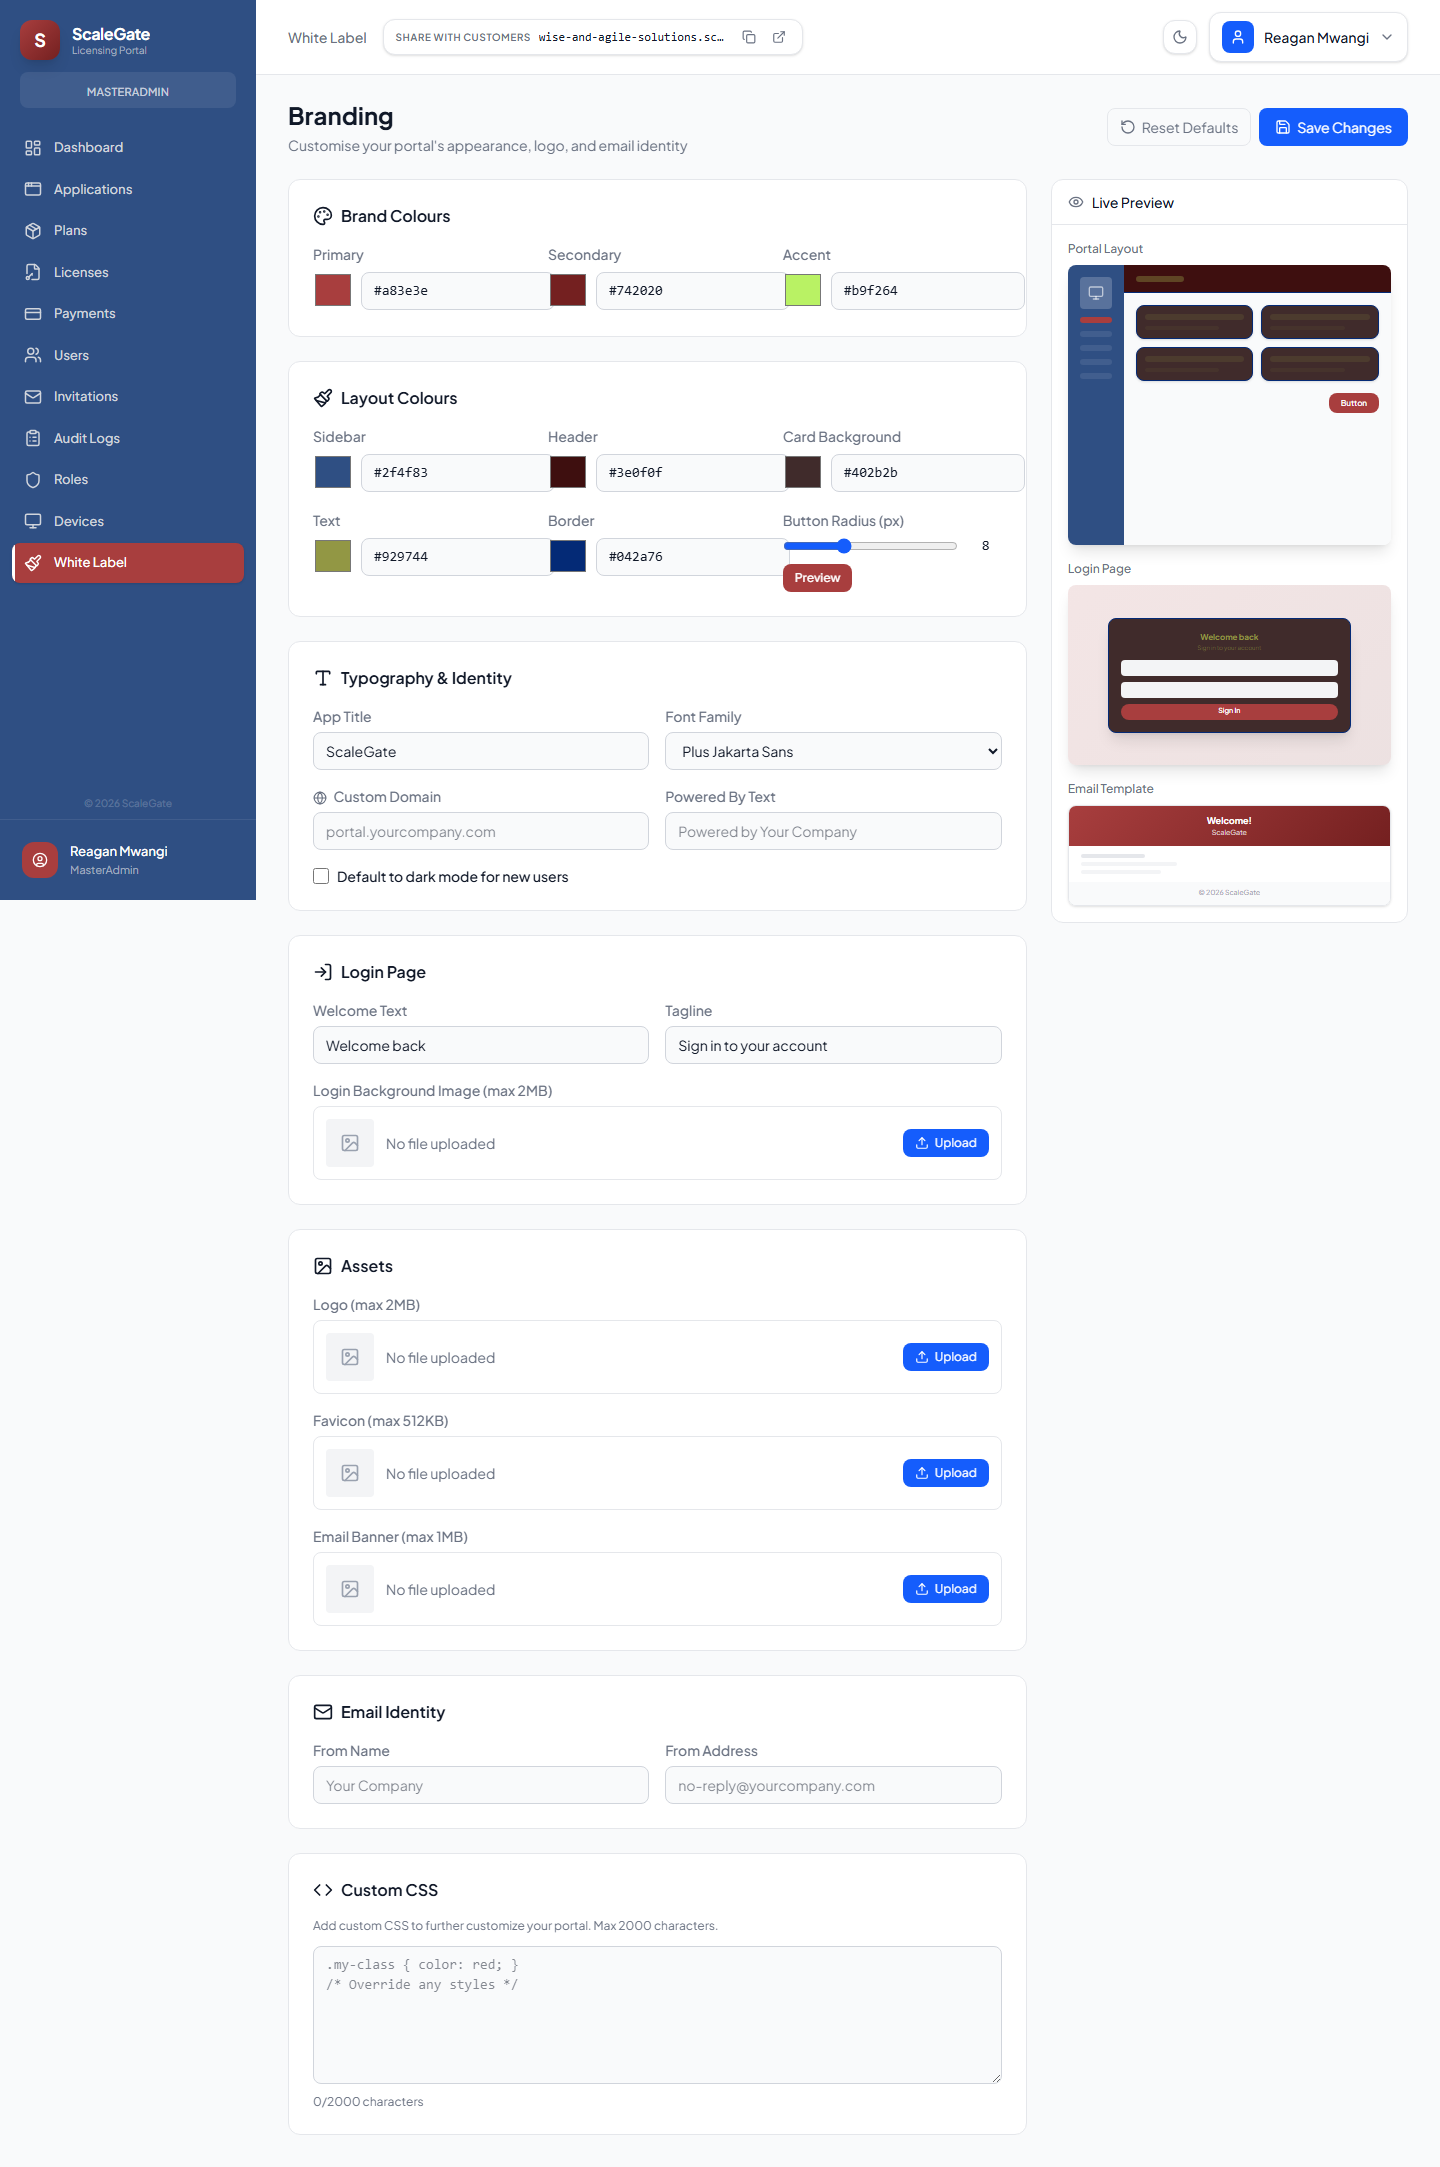
👀 What the customer sees
The most visually dense page in the admin, split into a scrollable form on the left and a Live Preview panel pinned to the right showing both the Portal Preview and Login Page preview. The form sections:
- Brand Colours — Primary, Secondary, Accent colour pickers
- Layout Colours — Sidebar, Header, Card Background, Text, Border, Button Radius
- Typography & Identity — App Title, Font Family dropdown, Custom Domain, "Powered By" text, default-to-dark-mode checkbox
- Login Page — Welcome Text, Tagline, background image upload
- Assets — Logo, Favicon, Email Banner uploads
- Email Identity — From Name, From Address (used in every outbound email)
- Custom CSS — a textarea for advanced tenants who want pixel-level control
At the top: Save Changes and Reset Defaults buttons.
💰 Why they'll pay for it
This is the single page that kills the "but it looks like someone else's product" objection. A prospect spends 3 minutes here and their portal looks like a bespoke product they built themselves. White labelling isn't a Stripe-tier upsell — it's included in every plan, and applies to the admin portal, the customer portal, and every outbound email. When a customer receives a password reset or a license receipt, it comes from the tenant's domain with the tenant's colours, not "noreply@scalegate.io".
🎯 Demo walkthrough
- Change the Primary colour — watch the Live Preview update in real time.
- Upload a logo — point at the sidebar preview updating.
- Change the Email From Name to the tenant's brand — "every email customers get will look like it's from you".
- Set a Custom Domain — "when you're ready, map
licensing.yourcompany.comhere and we auto-issue a free Let's Encrypt cert". - Click Save — the whole portal re-skins instantly.
⚠️ Things to know
The custom-domain field triggers automatic SSL provisioning via Caddy on-demand TLS — the first visitor to the domain triggers a Let's Encrypt challenge, which the platform validates against the tenant record before issuing a cert. That means custom domains "just work" within a minute of being set, no manual cert dance.
/profile
🔐 Admin Only
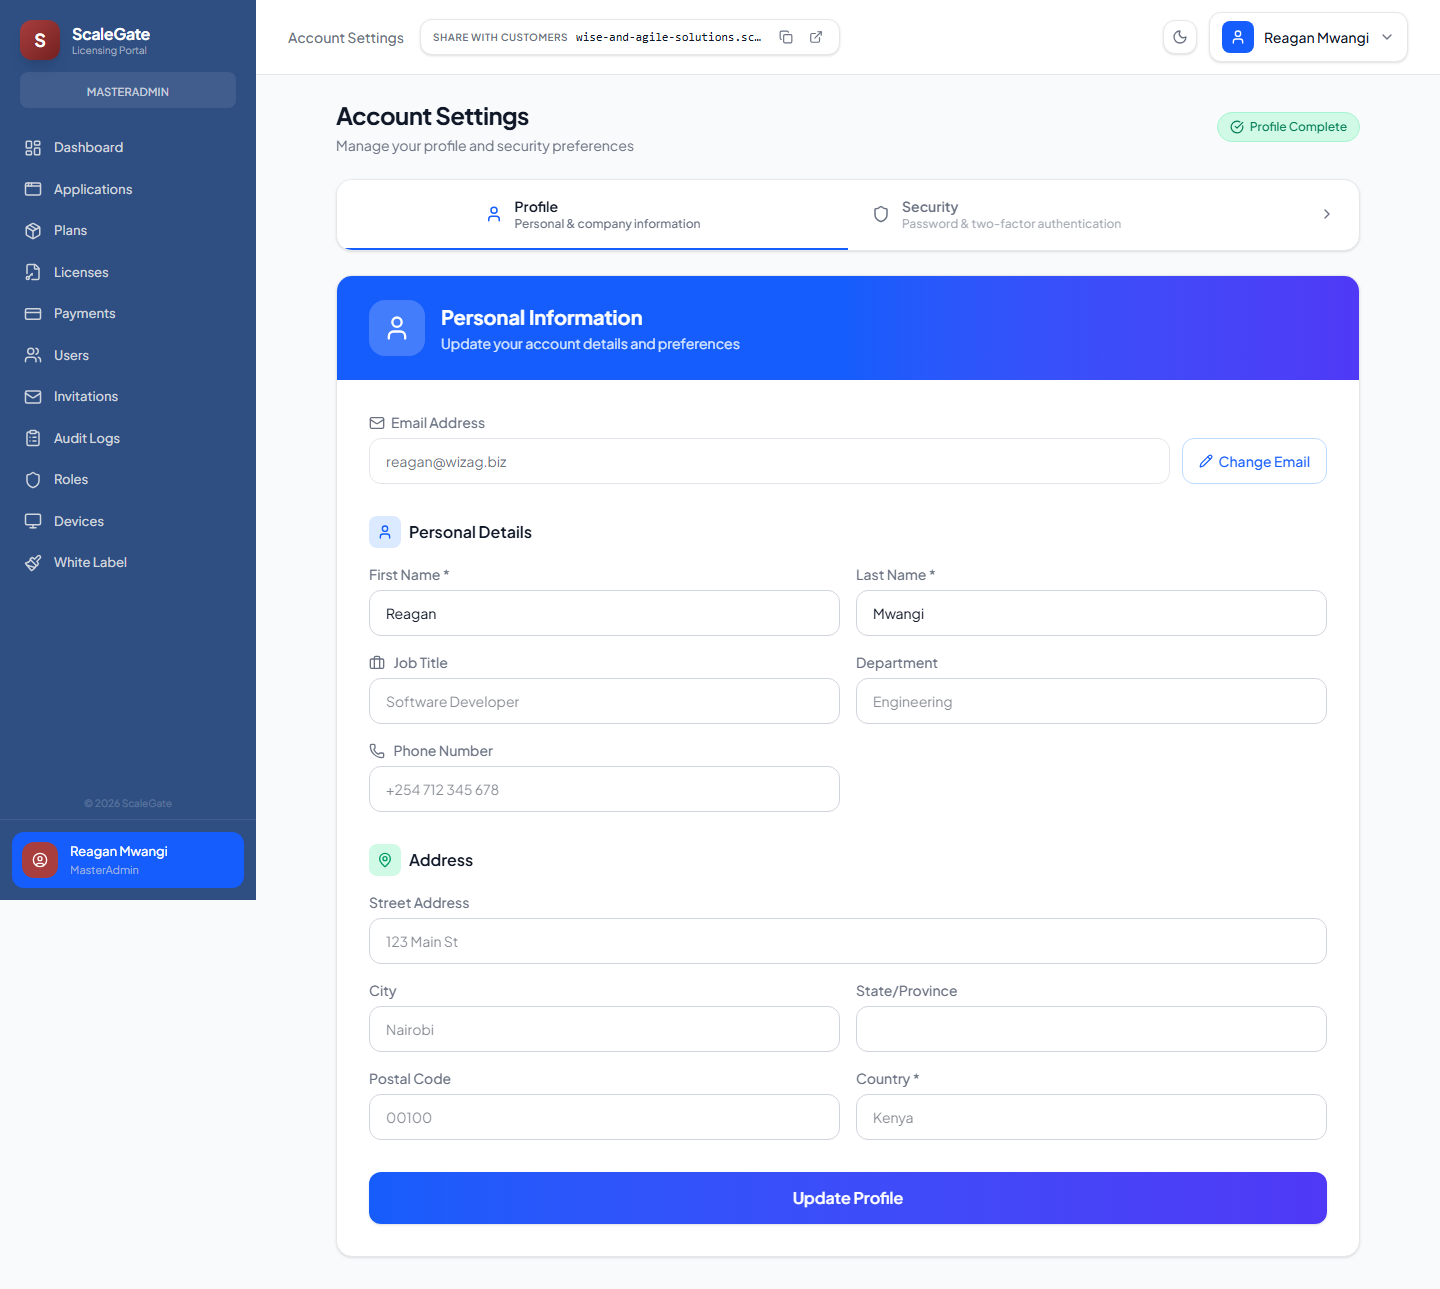
👀 What the customer sees
A tabbed settings page — Profile (active) and Security. The Profile tab has a blue gradient banner card with a user icon and "Personal Information / Update your account details and preferences". Below it, a stacked card with Email Address (plus a Change Email button), and then a Personal Details block with First Name, Last Name, Job Title, Department, Phone Number, and an Address block (Street, City, State/Province, Postal Code, Country). Update Profile button at the bottom. A green Profile Complete badge sits in the top-right when the user has filled everything in.
💰 Why they'll pay for it
Every admin sees this once when they accept their invitation, and again every time they want to change their password, enable MFA, or update their contact info. It's not a revenue-generating page, but it's the kind of polish enterprise buyers silently count as a "yes" vote — a product that treats admin profile management as a first-class feature rather than a hidden form.
🎯 Demo walkthrough
- Click the Security tab — show password change, 2FA setup with a QR code, active sessions.
- Click Change Email → confirmation flow sends a verification code to the new address.
- Point at the Profile Complete badge — "this turns into an Incomplete amber badge on the menu until the admin fills in everything, so nobody is missing a phone number".
⚠️ Things to know
The email change flow requires verification on both the old and new addresses — a compromised account can't silently move to an attacker-controlled inbox. Same protection applies to password reset: if a session detects a reset it invalidates every other active session system-wide.